This is one lab that you don’t want to miss! It’s easy, the materials are inexpensive (you probably already have them at home), and it ties together multiple concepts. Winner!
In this lab, students will analyze a pedigree of a fictitious family. In the introduction, students read that “Jon and Sue Smith” were in a car accident and need a blood transfusion. The hospital asks family members to donate, but students will need to figure out which family members are able to successfully donate. To complete this lab, students will need to understand blood types, punnett squares, and pedigrees. Its a great end-of-the-unit lab when you are finished with genetics.One piece of feedback I have gotten from my TpT store is that this lab can take a while to set up. I’m here to give you some tips to save you set up AND clean up time.
In this lab, students will analyze a pedigree of a fictitious family. In the introduction, students read that “Jon and Sue Smith” were in a car accident and need a blood transfusion. The hospital asks family members to donate, but students will need to figure out which family members are able to successfully donate. To complete this lab, students will need to understand blood types, punnett squares, and pedigrees. Its a great end-of-the-unit lab when you are finished with genetics.One piece of feedback I have gotten from my TpT store is that this lab can take a while to set up. I’m here to give you some tips to save you set up AND clean up time.
- You will need a total of 8 lab groups, because there are 8 people’s blood that needs to be tested. Each group will need 3 test tubes for blood samples, and 3 test tubes or cups with your anti-a, anti-b, and anti-rh serums.
- Pre-label 24 test tubes with A, B, and Rh before students come in. That’s 3 per group, with 8 groups total.
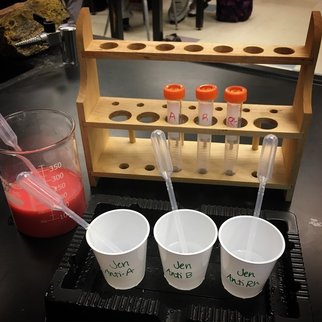
- Instead of putting the anti- serums in test tubes, I bought plastic cups. Don’t buy paper dixie cups! The liquids will soak through and you will have a mess on your hands. Each group will get 3 cups. I labeled the person’s name they are testing, and the type of anti-serum (See picture below).
- Plastic cups are a better option than test tubes because they are inexpensive, easy to label, and you don’t have to worry about eye-droppers getting stuck inside of test tubes. Some of the cups will contain water, and others will contain vinegar (depending on the blood type. Directions for this are included when you purchase the lab). I put a little dot with a sharpie on the bottom of the vinegar cups. That way, if there are any spills or I need to do refills I can easily check which cups need water and which cups need vinegar.
- If you have permanent lab tables already set up in your classroom where you can keep materials all day, kudos to you! But if you are like me, kids have to re-arrange desks before we do a lab so they can get in groups. The easiest way to move materials back and forth is to have a small tray or bin to put supplies in. I have plastic bins I bought at the dollar store that I can fit all the supplies in. Instead of sending kids up front to pick up 3 test tubes, 3 cups, and eyedroppers without spilling, all you have to do is hand them the bin.
- At the end of the period, make your students wash out the test tubes with the blood samples. Don’t kill yourself getting fresh ones out for each period! You will save yourself a lot of time and headache having them do it. I keep soap and test tube brushes by the sinks, and they are responsible for cleaning up after themselves at the end of the period.
Hopefully that helps save you some time! I really enjoy this lab and I know your students will too. If you are interested in purchasing this lab from my TpT store, CLICK HERE!

